relish
UI component testing for the Web and Android
![]()
Tutorial 4: Adding tasks
| < Relish components | ^ Tutorial | Adding more fields > |
Our first scenario was obviously very simplistic. Now let’s create a second, which requires a little more interactivity:
Scenario: I can add a task
  Given I am on the task list
  When I choose to add these tasks
    | Name           |
    | Buy some bread |
    | Buy some milk  |
  Then I will see this on the list of tasks
    | Name           |
    | Buy some bread |
    | Buy some milk  |
Here we’re using Cucumber feature-tables to specify the details of the tasks we going to add, and expect to the see on the application. Our scenario will begin by launching the app in the same way, but then will create a list of tasks, and check that they all appear on the front page as expected.
We’ll create each task with a second page containing a form that will allow us to enter the details of the task. When we save that task we’ll return back to the front page of the application, where we should see our new task listed.
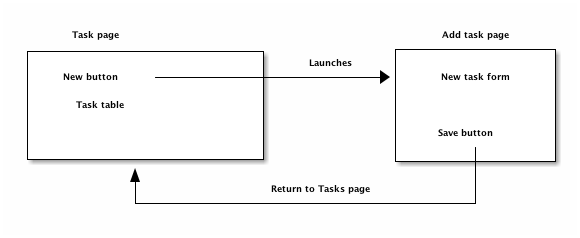
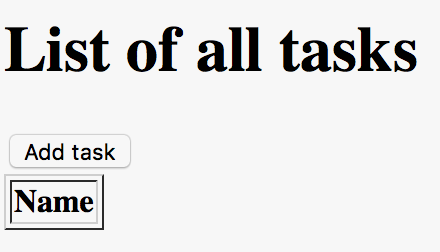
So we’ll a button on the front page for adding a task:
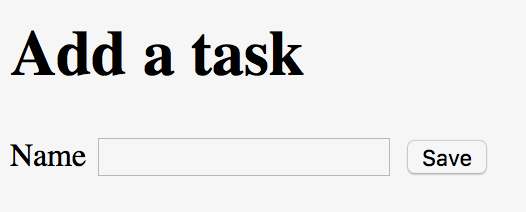
And we’ll need a second page with a simple form for entering a task, with a “Save” button:
When we click on the ‘Add task’ button on the front page, it will launch the ‘Add task page’, where we can fill out the details for the task, click ‘Save’ and return to the front page, where our new task will appear.
Implementing the ‘When I choose to add these tasks’ step
We’ll first modify our TaskPage class, adding in a testing component for the ‘Add task’ button:
package com.example.components;

import org.openqa.selenium.By;

import uk.co.blackpepper.relish.selenide.Table;
import uk.co.blackpepper.relish.selenide.Page;
import uk.co.blackpepper.relish.selenide.SelenideWidget;

public class TaskPage extends Page
{
    public TaskPage()
    {
        super("/index.html");
    }

    public Table taskTable()
    {
        return new Table(By.className("tasks"), this);
    }

    public SelenideWidget addButton()
    {
        return new SelenideWidget(By.className("addButton"), this);
    }
}
Our new addButton() method returns SelenideWidget Relish object. This is a generic component that represent some part of a web page that we can look at and click.
We’ll also need to create a class for our second page: the one for creating a new task. We’ll this AddTaskPage:
package com.example.components;

import uk.co.blackpepper.relish.selenide.InputText;
import uk.co.blackpepper.relish.selenide.Page;
import uk.co.blackpepper.relish.selenide.SelenideWidget;
import org.openqa.selenium.By;

public class AddTaskPage extends Page {
    public AddTaskPage() {
        super("/add.html");
    }

    public InputText name() {
        return new InputText(By.id("name"), this);
    }

    public SelenideWidget saveButton() {
        return new SelenideWidget(By.className("saveButton"), this);
    }
}
This class will be used to interact with the ‘Add task page’, which it will expect to find at path /add.html. It will include a button with the class name “saveButton” (which we represent by a SelenideWidget object), and also an InputText component with id “name”. InputText is another Relish component for interacting with text fields.
Now we that have our page objects structured in the way that we want, we now need to write a ‘When I choose to add these tasks’ step. Remember: this is what the step looks like in our scenario:
When I choose to add these tasks
  | Name           |
  | Buy some bread |
  | Buy some milk  |
This step will need to be passed the contents of the data-table containing the details of our new tasks. We normally do this in a Relish test by specifying the table as a list of Relish TableRow objects:
@When("^I choose to add these tasks$")
public void iChooseToAddTheseTasks(List<TableRow> tasks)
{
....
}
A TableRow is very similar to a Map<String,String> and it’s designed specifically to interact with Relish components. You’ll see how shortly.
Now that we’ve begun to create our step, we’ll need to fill out the code. We’ll loop through each of the TableRow objects from the table, and for each one:
- Click on the /Add Task/ button
- Enter details into the /Add New Task/ form that match the =TableRow=
- Click the /Save/ button on the form and return to the front page
This is how this is done in Relish:
@When("^I choose to add these tasks$")
public void iChooseToAddTheseTasks(List<TableRow> tasks)
{
    for(TableRow task : tasks)
    {
        taskPage.addButton().click();
        addTaskPage.set(task);
        addTaskPage.saveButton().click();
    }
}
Notice that we’re assuming here we’ve created a addTaskPage object higher up in the class.
The addButton() and saveButton() components (like all selenide-relish widgets) have click() methods. The interesting line is addTaskPage.set(task).
The set() method accepts a TableRow object and uses it to update all of the sub-components whose names match the columns in the TableRow. So because our table looks like this:
| Name |
|---|
| Buy some bread |
| Buy some milk |
The set() method will convert the (only) column “Name” into camel-case, and look for a name() method on the AddTaskPage object. In our case, this name() method returns an InputText field, and Relish will tell the InputText component to type in the strings “Buy some bread” and “Buy some milk” on each of the occasions that it visits the page.
If there had been multiple columns in the feature table, Relish would have looked for a matching component for each of them, and entered the data into each of the fields in the form.
This is where we start to benefit from the testing components built in to Relish: a lot of the boring “glue” code that takes data from a Cucumber scenario and passes it through to Selenide is done for us.
Implementing the ‘Then I will see this on the list of tasks’ step
Now we need to check that the tasks we entered in the previous step now appear on the list of tasks on the main screen:
Then I will see this on the list of tasks
  | Name           |
  | Buy some bread |
  | Buy some milk  |
This is actually remarkably easy to implement, because we already have all the components in place in the Page objects:
@Then("^I will see this on the list of tasks$")
public void iWillSeeThisOnTheListOfTasks(List<TableRow> tasks)
{
    taskPage.taskTable().matches(tasks);
}
This uses the matches() method of the taskTable() to assert that the table contains rows that match the detail of each TableRow. The Table object will handle all of the details of finding the column headings and matching them to the column names in the table.
That completes the scenario. This is the current state of our SomeSteps class:
package com.example.steps;

import com.example.components.AddTaskPage;
import com.example.components.TaskPage;

import uk.co.blackpepper.relish.core.TableRow;

import java.util.List;

import cucumber.api.java.en.Given;
import cucumber.api.java.en.Then;
import cucumber.api.java.en.When;

public class SomeSteps
{
    private TaskPage taskPage = new TaskPage();
    private AddTaskPage addTaskPage = new AddTaskPage();

    @Given("^I am on the task list$")
    public void iAmOnTheTaskList()
    {
        taskPage.launch();
    }

    @Then("^the list of tasks will be empty$")
    public void theListOfTasksWillBeEmpty()
    {
        taskPage.taskTable().assertEmpty();
    }

    @When("^I choose to add these tasks$")
    public void iChooseToAddTheseTasks(List<TableRow> tasks)
    {
        for(TableRow task : tasks)
        {
            taskPage.addButton().click();
            addTaskPage.set(task);
            addTaskPage.saveButton().click();
        }
    }

    @Then("^I will see this on the list of tasks$")
    public void iWillSeeThisOnTheListOfTasks(List<TableRow> tasks)
    {
        taskPage.taskTable().matches(tasks);
    }
}
| < Relish components | ^ Tutorial | Adding more fields > |